
With the recent news of Amazon’s MMO, New World, bricking RTX 3090 video cards due to the uncapped frame rate, I figured it would be a good time to detail how to enable a frame rate limit outside of a game. This is highly helpful as you won’t have to depend on a game to do the work, and you’ll have more over the settings. As I only have access to Nvidia GPUs, this guide will only apply to Nvidia GPUs.
Why would you want to enable a frame rate limit?
When a GPU is running at either an uncapped frame rate or a higher frame rate, it uses more power. The more power it uses, the hotter it gets. The hotter it gets, the harder the fans work and the louder they get. Now, depending on how your computer case is in terms of ventilation, you could be sending your GPU to an early grave. That’s not to say that more frame rates are bad because it isn’t. However, not every game needs 60 or more frames per second. Unless you’re playing an FPS or racing game, you’re just wasting power. Not to mention, if you have a monitor or TV that can’t do more than 60Hz, you’re wasting your precious power.
How to enable a frame rate cap with MSI Afterburner
- MSI Afterburner is perhaps the most popular GPU software suite and is used for several things. From frame rate capping, frame rate settings, overclocking, and more. For this guide, we’re going to focus on setting a frame rate cap.
- Download and install MSI Afterburner if you don’t already have it. If you’re downloading and installing it, the installer will include both MSI Afterburner and Rivatuner.
- Open up MSI Afterburner by locating it either via the program menu for Windows 7/8/10/11 or by locating it in the lower right-hand corner of your desktop. It will look like a fighter jet, so you can’t miss it.
- Before you do anything else, you may want to click the “Startup” option. This will make sure that MSI Afterburner and Rivatuner will start on reboot. Otherwise, you’ll have to launch it every time you reboot/ restart your PC. You can also enable this by going to the “General” option once you click the gear icon and select “Start with Windows” and “Start minimized” under “General properties.”
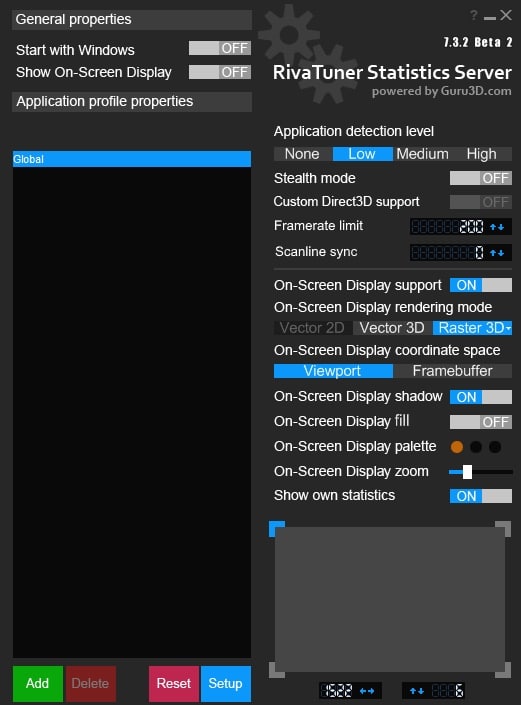
- Close MSI Afterburner, locate Rivatuner in your Programs, select “Rivatuner Statistic Server,” and launch it. If you don’t see it, look at your desktop in the taskbar and click on the icon that looks like a monitor with red font in it and click it.
- Once Rivetuner is opened, enable “Start with Windows.”
- Now, it’s time to set the frame rate cap. On the right-hand side, you’ll see several options. What you want is “Framerate Limit.” There, you need to put in your desired frame rate cap number. For example, if you want to cap your frame rate to “60”, you would enter “60”.
That’s it. Now, whenever you launch a game, the frame rate will be capped to whatever number you enter. This will override the frame rate cap in any game you’re playing as well.
How to enable a frame rate limit with Nvidia Control Panel
Not too long ago, Nvidia also added a method to cap your frame rate using the Nvidia control panel. And while this option is available, I’ve found that using Rivatuner is the better solution. However, both methods work, and it is ultimately up to you to decide which you want to use.
- Right-click the desktop and select Nvidia Control Panel from the drop-down menu.
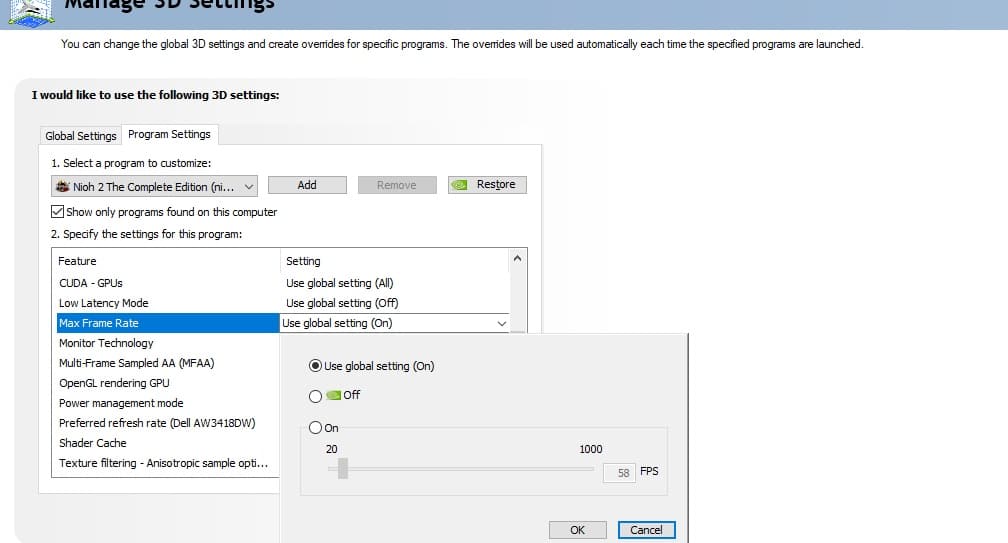
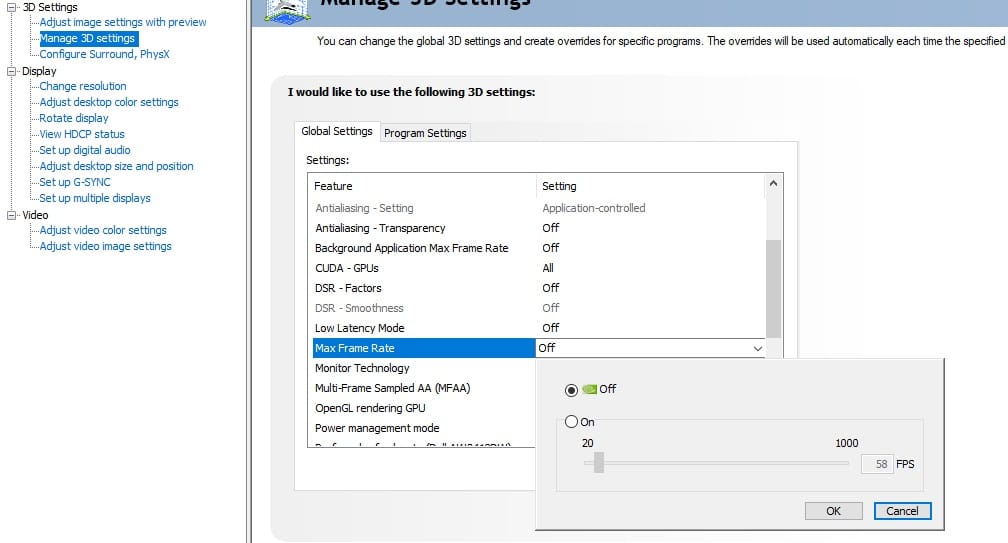
- Under 3D settings, select “Max Frame Rate,” you may have to scroll down to find it.
- Once there, click on “Off” and then select “On” and either scroll or type in your desired frame rate. Be sure to click “Apply” and the bottom to save the settings.
This will set the frame rate for all of your games. If you want to do this for a specific game, all you have to do is click on “Program Settings,” locate the game and then select “Max Frame Rate” and apply the fourth step from above.